


DIY Project: Rain barrel water collection
Collect and store free rain water, for use in gardens and yards. I did 30 hours of research and made some mistakes, so you don't have to.


If you have a roof, and it rains, you can collect and store rain water to improve your resilience. Having extra water increases your drought tolerance, extends your watering window, and may even save you some money.
Note: This assumes you already have gutters and downspouts connected to your roof, to move the water away. If not you will need to set those up first, which is big enough to be its own project.
Where Rain Water Collection Is Legal
Strangely, some countries allow collection of rainwater, and some do not. Check your country or local laws to confirm, before you begin. I collected a list of links and countries at the end of this article; updates or additional sources are welcome.
Tools You Need
A drill
A level
A pencil
Safety goggles
How To Do It
You will need a rain barrel, a sturdy base to stand it on, and a diverter to get the water from the downspout into the barrel. The diverter is the trickiest part, but I’ve done the research so you don’t have to.
The Barrel
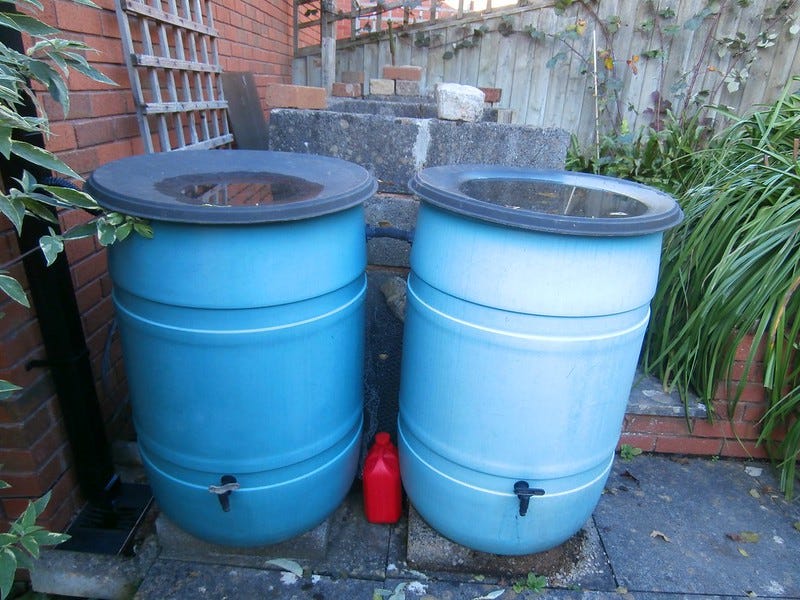
You want a food grade barrel. Depending on your goals and budget, you can often find these for free on craigslist or from local restaurants and food supply stores. You can also buy them at hardware stores. Some cities and counties have water barrel programs where they may give away or sell you barrels at a discounted rate. Check your local water utility.
I sourced a free barrel from a neighbour but it was not opaque. I wanted an opaque barrel so no light would get through to reduce algae growth. I ended up buying one from the hardware store.
A Closed Top
I prefer a barrel with a closed top, so mosquitos and critters can’t get in to breed or drown. Some barrels come with hatches. I assembled a hatch cover using some plastic and some old landscaping cloth, to keep sunlight out. This lets me access the barrel if needed to clean it or check the water level.
The Base
One gallon of water weighs 8.3 pounds or 3.7 kilograms. A 55 gallon barrel of water weighs 460 pounds, or 208kg. You need a sturdy base to hold this weight.

I used the following layers as a base:
Sand on the ground, below the base. Make sure this is level before you start. You may want to tamp down the ground to make sure it is compressed and stable.
24” square cement pad. These might be called “paving stones” or similar names, depending on where you get them.
Four standard cement blocks. These measure 8” bx 8” by 16”, so if you fit them into an “L” pattern you can put an 8” side and 16” side together to perfectly cover the 24” pad.
A second layer of cement blocks to raise the barrel up. This increases the water pressure, and is tall enough that you can fit a standard 5-gallon bucket under the tap. I fit the “L” shape for this layer the opposite way as the bottom blocks, for better weight distribution and visual appeal (note the blocks on layers one and two do not line up).
A second 24” cement pad on top
Make sure your base is level again, then set everything into place.
The Diverter
The diverter moves the water from the downspout into your rain barrel.
I spent thirty hours researching eleven different models of downspout diverters. In the end I chose the EarthMinded FlexiFit diverter.
I chose this diverter model because:
You only need to cut one small hole in the side of your downspout
You do *not* need to sever the entire downspout. So if the project does not work out, you can simply plug up the hole (plug included) and move on
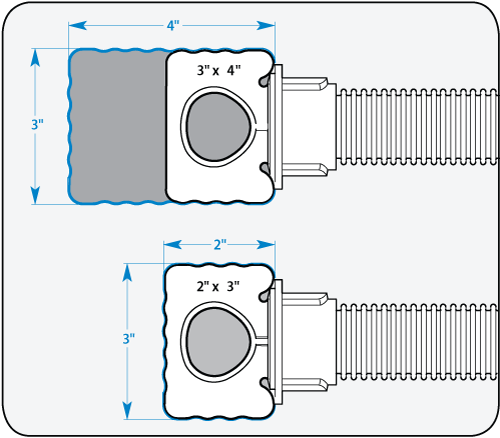
The diverter fits many sizes of downspout. Depending on where you live, your downspouts may be square, round, rectangular, and many different sizes -2”x3” , 3”x4”, round 3 to 6”, K-style, etc. The EarthMinded diverter is made of flexible, UV-resistant rubber (EPDM) so it can change shape slightly to accommodate your downspout. Even if it doesn’t fit exactly it can still collect *some* water. They do also sell a round model for round downspouts.
The diverter automatically handles overflow, so you don’t need to do anything. When the barrel is full, water flows back up the attachment hose to the top of the diverter. Any more rainwater then simply continues on through a hole in the diverter and down the spout. So long as your barrel is set correctly and the attachment hole is lower than the top of the barrel, you don’t need to worry or adjust anything when it rains or stops raining.
The water barrel system stays closed. Because the water flows in from the side, you can use a closed top barrel. This keeps out mosquitos, keeps out sunlight so algae doesn’t grow, and keeps animals from crawling into your barrel.
I prefer to buy from the company themselves, but you can also sometimes find this diverter at big box stores or hardware stores.
The EarthMinded installation video is pretty clear. Around 3:38 you can see how the diverter fits into the downspout. Because of surface tension, rain running into a downspout clings to the inside edges of the material. This diverter collects water nicely and funnels it into the connecting hose.

Setting It Up
Now that you have all of your parts the procedure is fairly easy.
Assemble your base, and put the water barrel on top.
Make sure the connecting hose can reach from the downspout to the barrel.
The important part is: make sure that the hole in the downspout is lower than the highest water level of the barrel. This is what makes the diverter work. If the hole in the downspout is lower than the top of the barrel, then once the barrel is full, water will push back into the connector hose and down the downspout, to continue away on its journey. If you attach to the downspout too high or too low, this won’t work. See the image below.
With your barrel in place, use your level to mark where the diverter should go, and where to drill the hole. If you have a short level, you can use a 2×4 or wooden board to help measure.

The EarthMinded kit comes with three circular saw blades for your drill – these are the sizes needed for the tap at the bottom of the barrel (small), the connector hose in the barrel (medium), and the diverter in the downspout (large).
I like to drill the hole for the connector hose in the barrel first, about 2-3” from the top of the barrel. Then place the barrel on the stand and measure a level connection for the hose. This tells me where to drill into the downspout.
Once you have drilled your hole, connect it up. If you have a garden hose you can test the diverter works by spraying water onto the roof and watching it flow down the spout, into the barrel.
How Much Water Will You Get?
Most likely - a lot. You need to know:
How big is your roof?
How much rain do you get each month?
Imperial units: One inch of rain on 1,000 square feet of roof collects 623 gallons of water. That’s enough water to fill more than 11, fifty-five gallon barrels. The pitch of the roof doesn’t matter. So multiply your roof’s square footage by 0.623 – that’s how many gallons you will get from one inch of rain.
In metric: one millimeter of rain on one square meter of roof collects one Litre of water.
Rainwater collection calculator here: https://www.watercache.com/resources/rainwater-collection-calculator
I have to put my barrel away during winter, so I only count rain received during the summer months.
If you have multiple downspouts, choose which one(s) you will use to install a barrel. Consider whether you want the biggest roof area, the closest spout to your garden or where you will use the water, or other needs.
How Many Barrels Do You Need?
One way to estimate how much water you might use is to calculate 0.5 gallons per square foot of garden space, per week.
Another strategy is simply to look at the space you have and how many barrels you could fit.
Starting with just one barrel is a fine plan. Use it for a season and track your use. How often do you empty the barrel? How often does it rain before you use all of the water? You can decide whether you need more barrels in more locations.
Suitable Roof Materials
Your water may be more- or less- clean, depending on what your roof is made of.
Clean, Good Roof Materials for Harvesting Rain Water:
Aluminum
Clay
Concrete
Standing-seam metal
Solar Panels
Steel
Terracotta
Tin
Okay, Acceptable Roof Materials:
Corrugated Metal – can be okay, but test your water to see if it contains too much zinc. You don’t want to drink that, and too much zinc can kill plants
Asphalt – can be okay. Several sources suggest not harvesting until after the roof is three+ years old, to avoid roof adhesives mixing into the water. Older shingles (especially before 1980) may contain asbestos, which is NO and bad.
Caution, check and test:
Cedar shake: Test any wood shingles for fire retardants, you don’t want to drink or use that
Copper: May be okay to drink? But copper is a natural herbicide, so don’t use it to water plants
Lead flashing: no
Biocides: Any roof using zinc- or copper-treated shingles
Apparently there are special roof coatings you can apply specifically to make it safe to collect rain water.
What Can You Use It For? How Long Is It Safe?
You shouldn’t normally drink rain water that has been collected into a barrel without properly filtering, cleaning, and processing it first. The main non-potable uses include watering your garden, watering trees or perennial fruit, or flushing toilets.
Here is one study from the New Jersey Agricultural extension. They find "overall the water quality of the rain barrel water [from homes with asphalt shingled roofs] was very good". Safe and usable for trees, plants, and lawns, but not potable and shouldn't be consumed without treatment.
They recommend:
Add one ounce of bleach to a 55 gallon barrel, once per month. Let sit for 24 hours before using the water.
Don't water the leaves or the plant itself; water the soil underneath the plant.
Water in the morning, so UV sunlight can help to disinfect
Another study from NC State has similar results: “harvested rainwater can be safely used for non-potable activities. .. if collected water is used to irrigate edible plants, wash the food thoroughly with treated water before consuming.”
I mainly use the water for perennial bushes and trees, so hopefully this should be fine.
Return On Investment (ROI)
So how well does a water barrel pay for itself? The biggest factor will depend on where you get your barrel. If you find a free barrel from a local restaurant versus paying $200 for a fancy barrel from a big box store, that will obviously affect your ROI.
Based on rough pricing and some rounding, I find the following costs for these materials:
Barrel: $0 to $150, depending
Cement pads: $15 each * 2 pads = $30
Standard cement blocks: $5 each * 8 blocks = $40
Water diverter kit: $50 with shipping
That gives a base cost of $30 + $40 + $50 = $120, plus what you spend for the barrel.
You will also need to know how much you pay for water. In many places if you are on metered city water they charge you not only for the water you use, but also a “drainage fee”; so you are charged twice for the same water. All the more reason to install these barrels!
All-in-all – In my area with my roof sizes, yearly rainfall, and price for water, a rain barrel should save me $20 to $30 per summer in reduced water use. At a cost of $120 for the base, this means the project pays for itself in 4 to 6 years. If you pay another $120 for the barrel itself, the project pays itself back in 8 to 12 years.
Personally I am happy with a 6 year return on investment that extends my drought tolerance and allows me to make good use of a free resource that would otherwise flow away. If the price of water goes up in your area, this would pay for itself even sooner. And if you are counting on this water to water your garden, water perennial food or fruit, or serve activities like flushing toilets during water restrictions, it is even more valuable. You will have to decide how much peace-of-mind and improved water security is worth for yourself.
I would love to hear about your rain barrel project!
—
More Info
Demystifying Diverters – info on how downspout diverters work, and related topics
References on roof materials:
References on water quality:
Laws On Rain Water Collection
Collection assessment – Australia, Brazil, China, Germany, and Singapore all allow and encourage collecting and using rain water.
The UK, collecting rain water is legal so long as it is kept separate from main drinking water
Canada (link to PDF) – legal to capture for use flushing toilets and surface irrigation
Japan – encouraged in many areas, with subsidies available
Belgium (source1, source2) – Rights to using and collecting water protected in the Constitution, with no legal requirement to connect your home to the local water distribution network. Many municipalities offer rebates for installing rainwater collection tanks.